Fedora 에서 소스를 가지고 VLC 설치

from Info/Tools 2009/04/16 02:08 view 107784
yum install vlc 를 하면 되기도 하지만 vlc 를 변경 하고자 할때 소스 를 통해 설치 해보자.
핵심은 libxxx-devel 을 깔아야 된다는거.

http://www.videolan.org/ 에서 소스를 다운 받는다.

./configure 를 하면 libmad 가 없다고 뜬다.
yum install libmad
yum install libmad-devel

liabavcodec 없다고 뜨면
yum install ffmpeg
yum install ffmpeg-devel

liba52 가 없다고 뜨면
http://liba52.sourceforge.net/ 에서 소스를 다운받고 설치.

혹시라도 make install 도중 relink 어쩌고 저쩌고 에러가 뜨면 전에 수행한 make 과정이 남아있는 거므로
make clean 을 수행한후 다시 진행해보면 된다.
gdb vlc 를 수행 시키기 위한 방법. 그냥은 안되네..

1. http://www.live555.com/liveMedia/public/  메뉴얼 보고서 live 깔고 다른건 yum install xx 를 통해 깔자.

2. debug 를 위한 configure .. , yum install faad2*, libdca* 과 같은 라이브러리가 필요하기도 함.

./configure --enable-x11 --enable-xvideo --disable-gtk --enable-sdl --enable-ffmpeg --with-ffmpeg-mp3lame --enable-mad --enable-libdvbpsi --enable-a52 --enable-dca --enable-libmpeg2 --enable-dvdnav --enable-faad --enable-vorbis --enable-ogg --enable-theora --enable-faac--enable-mkv --enable-freetype --enable-fribidi --enable-speex --enable-flac --enable-livedotcom --with-livedotcom-tree=/usr/lib/live --enable-caca --enable-skins --enable-skins2 --enable-alsa --disable-kde--disable-qt --enable-wxwindows --enable-ncurses --enable-release --enable-debug
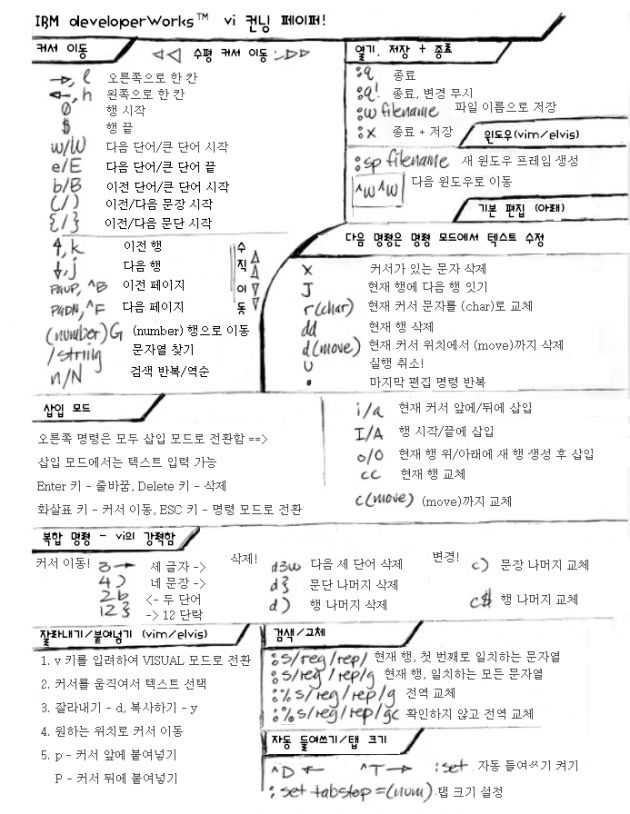


Tag | , ,

더욱 자세한 사항은 http://www.pyrasis.com/main/Subversion-HOWTO 를 참고한다.

Apache로 말고 순수하게 svn:// 로 접속해서 사용할 수 있도록 만들고자 한다. svn://을 사용하면 Apache를 사용할때보다 더욱 빠르다고 한다.

먼저 SVN을 사용하기 위해서 저장소(Repository)를 만들어야 한다. 이 저장소는 프로젝트마다 하나씩 필요할 것이다. 난 /home/svn/에 저장소 root를 잡을려고 한다.

#mkdir /home/svn

그런 다음 만든 svn폴더로 가서 파일 시스템(버클리 DB를 사용할 수도 있다.)을 이용한 sample이라는 이름으로 저장소를 만든다.

#cd /home/svn
#svnadmin create --fs-type fsfs sample

/home/svn/sample/ 로 가서 ls를 하면 관련 파일들이 있으며 여기 있는 파일을 임의로 수정하게 되면 데이타를 다 잃어버릴 수도 있으니 주의하기 바란다.

이제 SVN을 실행한다. 실행하면 3690 포트가 열린다.

#svnserve -d -r /home/svn

테스트 하기 위해

#svn checkout svn://(서버 IP또는 도메인)/sample

checked out revision 0. 이 나오면 제대로 설정한 것이다. 현재상태는 누구나(Anonymous) 저장소에 접근해서 체크아웃, 커밋이 가능하다.


Svnserve에서 ID로 인증하기

Subversion 0.33.0 이후로 ID로 사용자 인증이 가능하게 되었다. 그래서 아까 만들어 놓은 저장소안에 /home/svn/sample/conf/svnserve.conf 파일을 찾아서 설정만 해주면 된다.

#vi /home/svn/sample/conf/svnserve.conf

### This file controls the configuration of the svnserve daemon, if you
### use it to allow access to this repository.  (If you only allow
### access through http: and/or file: URLs, then this file is
### irrelevant.)

### Visit http://subversion.tigris.org/ for more information.

[general]### These options control access to the repository for unauthenticated
### and authenticated users.  Valid values are "write", "read",
### and "none".  The sample settings below are the defaults.
anon-access = none
auth-access = write

### The password-db option controls the location of the password
### database file.  Unless you specify a path starting with a /,
### the file's location is relative to the conf directory.
### The format of the password database is similar to this file.
### It contains one section labelled [users]. The name and
### password for each user follow, one account per line. The
### format is
###    USERNAME = PASSWORD
### Please note that both the user name and password are case
### sensitive. There is no default for the password file.
password-db = passwd
### This option specifies the authentication realm of the repository.
### If two repositories have the same authentication realm, they should
### have the same password database, and vice versa.  The default realm
### is repository's uuid.
realm = jidolstar's Repository

위 와 같이 설정하면 anon-access=none에 의해 아무나 read를 못하게 막는다. 만약 이부분이 read라면 아무나 들어와 읽을 수 있다. 그리고 auth-access=write는 ID로 인증된 사람만 쓰기 권한을 주게 된다.
password-db = passwd는 /home/svn/sample/conf/ 아래에 passwd 이름으로 ID를 만들 수 있다.
이것은 다음과 같이 만든다.

#vi /home/svn/sample/conf/passwd

[users]
sampleuser = password1234

설정이 완료되고 svn checkout svn://(사용자 도메인)/sample 으로 접속하면 ID와 비밀번호를 입력하여 성공하면 "checked out revision 0" 이 나온다.

여기서 잠깐!!!
외부에서 우리가 설치한 SVN에 접근하기 위해서는 반드시 3690 포트가 열려 있어야 한다.

3690 포트가 열려있는지 확인하기 위해 다음과 같이 확인해보자

# nmap localhost -p1-9999
....(생략)
3690/tcp open  unknown....(생략)
Nmap run completed -- 1 IP address (1 host up) scanned in 1.165 seconds

3690 포트가 없다면 방화벽을 의심해본다.

# vi /etc/oops-firewall/filter.conf
에서 TCP_ALLOWPORT에 3690을 추가한다.
그리고 firewall을 다시 실행한다.

# service oops-firewall restart
Tag | , ,
링크 : 1. http://www.thinkwiki.org/wiki/Installation_instructions_for_the_ThinkPad_X200
         2.F10 and xorg intel driver: solved
3.http://intellinuxgraphics.org/download.html


에러 해결 #1 : 링크2에 설치 법대로 inter driver 를 깔다가 에러 나는경우 yum install xorg-x11-server-dev*

./configure: line 21484: syntax error near unexpected token `XINERAMA,’
./configure: line 21484: `XORG_DRIVER_CHECK_EXT(XINERAMA, xineramaproto)’

However after installing ‘xorg-x11-server-devel-1.5.3-6.fc10.i386′ it worked correctly.


// Fedora10 경우에도 /etc/X11/xorg.conf 에 설정함..
ㅜ_ㅜ 위 링크에 전부 설명 되어있다. 괜히 찾아 돌아다니지 말자..

Ubuntu(우분투) 에서 필요한 설정 몇가지..

1. 듀얼모니터(dual monitor) 설정

Display


With 8.10 things don't work well if you stick with the "preconfigured" xorg.conf settings: the default resolution is only 1074x768 and the highest setting that the laptop display is capable of (1280x800) doesn't even show up in the System -> Preferences -> Screen Resolution applet. To make matters worse, VGA output is a royal pain.

Here's a step-by-step guide to improve the situation if you just want to get the laptop display working properly:

  • First, make sure you've got the latest drivers for your Intel 4500MHD video card:
$ sudo apt-get install xserver-xorg-video-intel
On current 8.10, this step seems unnecessary. You get intel by default, and by this point in the install, you should have already have updated your packages. Mitchell 01:28, 15 December 2008 (CET)
  • Once that's over and done with, open up your xorg.conf file (note: be careful with this file):
$ sudo gedit /etc/X11/xorg.conf
  • Make the part that isn't commented out (i.e. that isn't preceded by a #) look like this:
Section "Monitor"
Identifier "Configured Monitor"
EndSection

Section "Monitor"
Identifier "HDMI-1"
Option "Ignore" "True"
EndSection

Section "Monitor"
Identifier "HDMI-2"
Option "Ignore" "True"
EndSection

Section "Screen"
Identifier "Default Screen"
Monitor "Configured Monitor"
Device "Configured Video Device"
DefaultDepth 24
SubSection "Display"
Modes "1280x800" "1024x768"
# The following line was an auto-configuration added by an external VGA projector; you might leave it out to try
# letting the system detect dimensions appropriate for whatever display you happen to use.
Virtual 2432 864
EndSubSection
EndSection

Section "Device"
Identifier "Configured Video Device"
Driver "intel"
Option "monitor-HDMI-1" "HDMI-1"
Option "monitor-HDMI-2" "HDMI-2"
EndSection

2. Track Point( 스크롤 키 설정 )

TrackPoint

Trackpoint scrolling is, as of 12/02/08, not in a good way on 8.10.

There are numerous instructions on the net which don't work for the X200, including instructions here ([How to configure the TrackPoint]).

On the X200, the HAL-based instructions in the last section may work, but only until suspend/resume or VT switching, due to a bug in evdev.

I do have it working, but it is not pretty:

  • Create a patched evdev. The following is based on instructions from the bug report. These instructions will be extremely fragile - they work for me today but could stop working at any point, based on updates to evdev or changes to the bug. The lines below do the following:
    • Set up a work area
    • Download the patch from the bug report
    • Prepare your environment for building evdev
    • Download the evdev sources
    • Patch them
    • Produce a new deb
    • Install it
sudo bash
cd /usr/local/src/
mkdir evdev
cd evdev
wget http://launchpadlibrarian.net/19254960/preinit.diff
apt-get build-dep xserver-xorg-input-evdev
apt-get source xserver-xorg-input-evdev
cd xserver-xorg-input-evdev-2.0.99+git20080912
patch -p1 < ../preinit.diff
debian/rules binary
cd ..
dpkg -i xserver-xorg-input-evdev_2.0.99*.deb
  • Add xinput lines to your .profile; with this patch, the normal HAL method no longer works (though note, I have not tested this with no hal policy for the trackpoint at all, just left the non-working one in place. YMMV).
# TEMPORARY FIX FOR BROKEN EVDEV/HAL for TrackPoint scrolling:
xinput set-int-prop "TPPS/2 IBM TrackPoint" "Wheel Emulation" 8 1
xinput set-int-prop "TPPS/2 IBM TrackPoint" "Wheel Emulation Button" 8 2
xinput set-int-prop "TPPS/2 IBM TrackPoint" "Wheel Emulation Y Axis" 8 4 5
  • reboot your system.

This _should_ enable trackpoint scrolling that will be durable through suspend/resumes.

At some point they will fix the upstream evdev package, and/or adjust other configs. You may see this suddenly stop working after an update (evdev was updated but this fix wasn't in the update); in which case, re-run the steps above to create an updated patched evdev (hopefully). Or the update may carry an upstream fix; latest word in the bug is that the unstable upstream debian packages work out of the box. In which case you should simply come back and reexamine whether the xinput lines in the .profile are still necessary at a later date, or you can use the more canonical HAL profile to control the trackpoint properties.

Using HAL policy

For me this works fine (Ubuntu 8.10):

Create an file /etc/hal/fdi/policy/mouse-wheel.fdi an put the following into it:

<match key="info.product" string="TPPS/2 IBM TrackPoint">
<merge key="input.x11_options.EmulateWheel" type="string">true</merge>
<merge key="input.x11_options.EmulateWheelButton" type="string">2</merge>
<merge key="input.x11_options.YAxisMapping" type="string">4 5</merge>
<merge key="input.x11_options.XAxisMapping" type="string">6 7</merge>
<merge key="input.x11_options.Emulate3Buttons" type="string">true</merge>
<merge key="input.x11_options.EmulateWheelTimeout" type="string">200</merge>
</match>

Reboot and scrolling with the trackpoint should work.


Tag | , , ,
/sbin 폴더내에 실행파일들을 다른 경로에서 실행하게 하기 ㅜ_ㅜ

PATH 라 PATH 라고 한다면, 경로 라고 말씀 드리는게 편하겠네요..

간단하게 명령어를 예를 들겠습니다.

리눅스 상에서

# echo $PATH <-- 라고 일단, 쳐 보십시오.

/usr/local/sbin:/usr/local/bin:/sbin:/bin:/usr/sbin

이런 식으로 display가 되어 질겁니다.

useradd 란 명령어가 있습니다. /usr/sbin 이란 폴더에 존재 하죠.

우리가 사용자를 추가 하기 위해서 # usradd xxxx 라고 치면,

리눅스는 위의 $PATH 를 참조하여

위의 나열된 순서대로(/usr/local/sbin:/usr/local/bin:/sbin:/bin:/usr/sbin)

/usr/local/sbin 에 가서 useradd 를 찾고, 다음으로 /usr/local/bin 에 가서

useradd 를 찾습니다. 이런 식으로 path 에 지정된 위치들을

순서대로 찾아 가면서 위의 명령어를 찾게 되는거죠. 말 그대로 path(경로)

명령어의 경로를 지정해주는거죠. 우리가 직접적으로 /usr/sbin/useradd

와 같이 특정 위치를 지정해주지 않는 한 (../ ./ / <-- 특정 위치 지정)

path 에 따라서, 명령어를 찾아 주게 되는거죠.

그럼 이 PATH 를 변경은 어떻게 시켜줄까요?

사용자 측면에서 변경와 전체적인 변경이 존재 합니다.

사용자 측면이라면 (bash shell 사용시)

자신의 홈폴더의 (ls -al 자신의 홈 폴더 하면 보입니다.)

.bash_profile 이 있습니다.

# vi .bash_profile 하고 열어 보시면,

PATH=$PATH:$HOME/bin <-- 이런 부분이 보일겁니다.

# source .bash_profile

이 뒷 부분에 추가할 경로를 쳐주시면 사용자가 로그인시 PATH 환경

변수에 추가 되는거죠. (부팅시 .bash_profile 을 시작해준다.)

동일하게 전체적인 방식은

# vi /etc/profile

PATH=$PATH:/usr/local/sbin:/usr/local/tomcat/bin
export PATH

맨뒤에 위의 두줄을 추가 시켜 주시고

# source /etc/profile 해주시면 적용됩니다.

$PATH 나 $HOME 은 그 환경 변수의 값을 넣는다는 거죠.


* 만약 동일한 명령어가 path 에 잡혀 있는 경로 상에 두개가 존재 한다면

우선 하는 경로의 명령어가 실행 됩니다. 간혹 이런 문제로 인해 문제가 발생

하신 분들이 계십니다. 즉, 엉뚱한 명령어가 실행 되게 되는거죠. *
Tag |
내장 스피커의 소음 방지

생각보다 내장 스피커의 소음이 시끄럽다고 느낀다면 다음의 방법을 사용하여 소리가 나지 않게 할 수 있다.
X 윈도우 환경이라면 ~/.xsession 이나 ~/.xinitrc에서 다음과 같은 명령을 실행시켜 준다.

xset b off

bash 라면 /etc/inputrc 나 또는 $INPUTRC가 가지고 있는 장소에 다음과 같이 입력한다.

set bell-style none


tcsh 사용자라면 ~/.tcshrc 에 다음과 같이 입력한다.

set nobeep

한텀을 사용하는 경우라면 visual bell 기능을 사용할 수 있다.  

다음 한텀 리소스 파일에서 visual bell : false를 true로 바꿔주면 된다.

/usr/X11R6/lib/X11/app-defaults/Hanterm

그렇지 않으면 한텀 화면에서 Ctrl + 마우스 가운데 버튼을 눌러서 나오는 메뉴 중에서 Enable Visual bell을 선택하여 사용할 수도 있다.

만약에 사운드 카드가 있다면 커널을 패치하여 사운드 카드에서 소리를 조절함으로써 내장 스피커를 사용하지 않도록 할 수 있다. 먼저 하드웨어적인 설치를 한다. 즉 스피커의 선을 사운드 카드에 연결하는데 보통의 사운드 카드라면 이러한 일을 할 수 있도록 되어 있다. 그리고 다음의 장소에서 oplbeep를 가져온다.

ftp://sunsite.unc.edu/pub/Linux/apps/sound

oplbeep 는 표준 beeper를 Yamaha FM synthesizer 로 보내는 역할을 한다. 이것을 사용하기 위해서는 oplbeep.kernel-patch를 하고 커널을 재 컴파일한다. 그리고 인스톨 한 다음에 부팅을 시킨다. 그런 다음 Beep.o 라는 모듈을 만든다. 그리고 insmod 명령으로 인스톨을 시킨다.

insmod Beep.o OPL3_PORT=FM-synthesizer-port-address

synth의 주소는 부팅 메시지로부터 확인할 수 있다. 보통은 다음과 같다.

snd1 at 0x388 irq 0 drq 0

소리를 들어보고 좋으면 사용하고 아니면 rmmod Beep 명령으로 모듈을 제거해 줄 수 있다.
Tag |

리눅스에서 FTP 사용하기

from Info/Tools 2008/12/30 15:34 view 28925

원문 : http://danggi.tistory.com/entry/리눅스-ftp-사용하기

* 실행 환경 페도라. (우분투도 크게 다르지 않음)

1. ftp 다운로드 하기

]# yum install vsftpd

 -> vsftp는 ftp 이름이다. profrp 도 있다. 원하는 대로 하면 됨.

2. ftp 환경설정

]# vi /etc/vsftp/vsftp.conf

=========== vsftp.conf ================

#임의의 사용자에게 공개할 것인지를 뜻하는 부분 공개 ftp가 아니라면 주석처리 해준다.

# anonymous_enable=YES


# 접속한 사용자가 상위 폴더를 이용하지 못하도록 하는 부분.
# ftp 프로그램 (알 ftp같은 것) 을 이용한다면 상위폴더에 접근 가능하므로 이것을 막아준다.
# 아래 부분의 주석처리를 해지해 준다.
# chroot_list는 어떤 conf 파일에서는 /etc/vsftpd.chroot_list로 되어있는 경우가 있다.
# 상관없으니 그냥 되어 있는대로 하면 됨.

chroot_list_enable=YES
chroot_list_file=/etc/vsftpd/chroot_list


# 저장
================================================

이제 어떤 ID를 상위폴더에 접근하지 못하게 할 것인지를 설정한다.
vsftpd.conf 파일에서 지정해준 chroot_list 위치대로 파일을 연다. (없을때는 그냥 생성 됨)

]# vi /etc/vsftpd/chroot_list

접근을 막을 ID를 써준다. (한줄에 하나씩)

3. ftp 실행

vsftp 데몬을 재시작.

]# /etc/init.d/vsftpd restart

=====================================================

ffp는 리눅스의 일반계정에 등록되어 있는 계정을 쓰면 된다.

Tag | ,

리눅스(Fedora, Ubuntu)에서 QT설치하기

from Study/QT 2008/12/30 15:32 view 66073
원문 : http://danggi.tistory.com/entry/리눅스-QT-설치

Fedora에서의 QT 설치는 매우매우 쉽다. ㄱ-
Ubuntu에서는 가끔 안되기도 한다. -_-;;

1. qt-x11을 다운 받는다.
   ftp://ftp.trolltech.com/pt/source


여기에서 가장 최신 버전을 찾아 받은후 압축을 풀어준다.

[bbonya@localhost qt]$ tar -xvzf qt-x11-3.3.8.tar.gz


2. 디렉토리 명을 간단하게 수정해 준다.
[bbonya@localhost qt]$ mv qt-x11-3.3.8 ./qt-x11

3. 환경변수를 등록해준다.
[bbonya@localhost qt]$ vi ~/.bash_profile

QTDIR=$HOME/qt/qt-x11
PATH=$PATH:$QTDIR/bin
MAN_PATH=$MANPATH:$QTDIR/doc/man
LD_LIBRARY_PATH=$LD_LIBRARY_PATH:$QTDIR/lib
export QTDIR PATH MAN_PATH LD_LIBRARY_PATH

[bbonya@localhost qt]$ source ~/.bash_profile

4. configur
[bbonya@localhost qt-x11]$ ./configure -no-xft -release -shared

   >> ./configure뒤에 붙은 아이들은 옵션이다. no가 붙은건 쓰지 않겠다는 뜻.
   >> license 동의 여부를 물으면 yes 라고 답해준다.
   >> configure --help 하면 더 많은 옵션들을 볼 수 있다.

5. make
[bbonya@localhost qt-x11]$ vi Makefile

all: symlinks src-qmake src-moc sub-src sub-tools # sub-tutorial sub-examples
 @echo

   >> sub-tutorial 앞에 #을 붙여서 주석처리 해준다. (make 시간 단축)

[bbonya@localhost qt-x11]$ make

   >> make 하는 시간이 쏘 오래 걸리니... 산책이라도 해주는 센스.

6. Tip in Ubuntu...
Ubuntu에서는 버전이 낮을시에 가끔 make에서 에러가 나기도 한다.
그럴때는 apt-get install을 이용하여 이것저것 받아줘야 하는데..
한꺼번에 너무 많은걸 받아서 정확히 뭐가 make를 제대로 하게 했는지 알 수가 없다 ㅠㅠ
(다른 사람 컴퓨터에서 test 해보려 했더니 한번에 돌아가더라는... ㅡ_-);;

qt를 apt-get을 통해 받을때 그 패키지의 종류는 대략.
qt3-qtconfig, qt3-linguist, qt3-dev-tools-embedded, qt3-dev-tools-compat
qt3-assistant, qt3-dev-tools, qt3-designer, qt3-apps-dev, libqt3-mt

이아이들이다. 내가 생각하기에 libpt3-mt, qt3-apps-dev, qt3-dev-tools 가 좀 유력한 후보이다.
designer라는건 어차피 make하고나면 생기는 아이이니까.... ㅡ_-);;
가만 생각해보면 이아이들을 골고루 받으면 굳이 다운로드 받지 않고도
QT프로그래밍을 할 수있을 것이다. (designer는 비쥬얼 스튜디오 같은 아이니까;; )
그러나... 역시 사용법을 모른다는거~ ㅠ.ㅠ
아놔, install 패키지 이름들을 알아낸게 너무 기뻐서 줄줄이 받은게 화근. ㄱ- (머리나쁘면 평생 고생)
Tag | ,

'man'이라는 명령을 이용하여 도움을 받을 수 있다.

$> man errno

'ERRNO(3)' 이라고 표시 되는데 괄호 안에 있는 번호는 맨 페이지의 섹션 번호를 나타낸다.

즉, ERRNO에 대한 설명은 맨페이지의 세 번째 색션에 있다는 것이다.

섹션이란 유닉스 상에서 필요한 도움말들을 종류별로 구분해 놓은 것이다.

1번 섹션은 쉘에서 실행하는 일반 프로그램들에 대한 도움말을 다룬다.

2번 섹션은 시스템 콜에 대한 것이다.

3번 섹션은 라이브러리 함수에 대한 것이다.

이밖에도 총 아홉 개의 섹션이 존재한다.

시스템 콜 'write'를 찾고 싶은 경우는 반드시 다음과 같이 섹션을 명시해 주어야 한다..

$> man 2 wirte


Tag |

vi에디터를 사용해볼까?

from Study/Linux 2007/02/01 19:03 view 26696

%주의% : 시작하기 전에 ~/.bashrc 에 alias vi ='vim' 을 추가하고 시작!! 특히 root.. ㅜ_ㅜ

1. vi 기본지식

more..


2. .vimrc

root 는 /root/ .vimrc  , 사용자는 /home/사용자/.vimrc, 전체설정은 /etc/vimrc or /etc/vim/vimrc

more..

3. 정보들

more..

4. VIM 팁모음

more..


5. 명령어 모음!

more..


6. ctag 사용( 소스분석에 적합 )

more..


Tag | ,